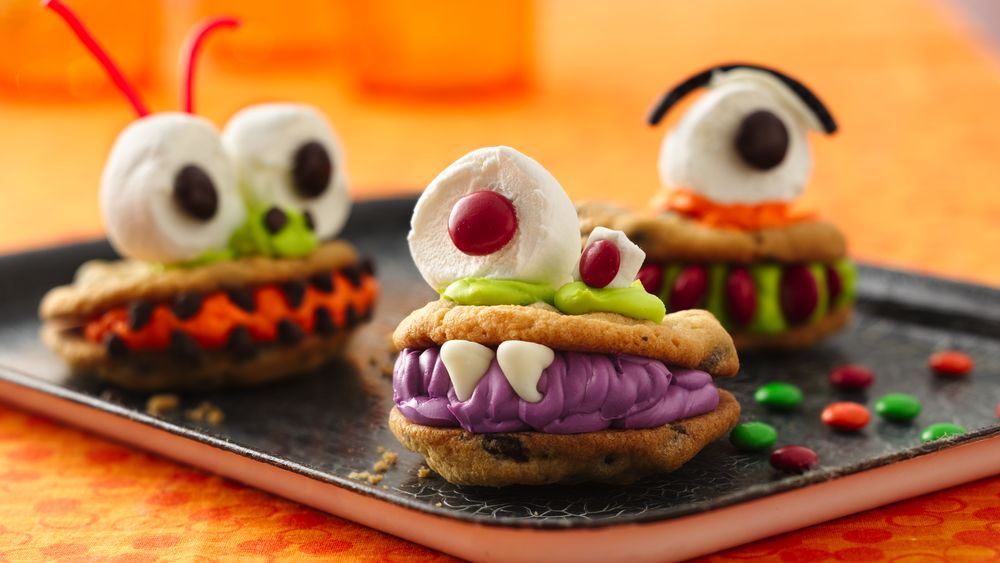
Cookies and frosting and candy, oh my! Monster sandwich cookies are the perfect Halloween treat – they’re scary good!
I have included my chocolate chip cookie recipe below, but if you prefer, you can buy chocolate chip cookies or use Chips Ahoy.
Monster Sandwich Cookies
Yield: Makes about 10 cookie sandwiches
Ingredients
For the chocolate chip cookies
- 2 and 1/4 cups flour (281.25 grams)
- 1 teaspoon baking soda
- 3/4 cup Challenge salted butter, room temperature
- 1 cup brown sugar (207 grams)
- 1 (3.4 oz) package instant vanilla pudding
- 2 eggs
- 1 teaspoon vanilla
- 1 cup semi-sweet chocolate chips
- (Plus candy eyes and white chocolate chips for teeth)
For the milk chocolate frosting
- 1 cup (2 sticks) Challenge unsalted butter, softened to room temperature
- 3 and 1/2 cups (441 grams) confectioners’ sugar
- 1/2 cup (50 grams) unsweetened cocoa powder
- 1/4 teaspoon salt
- 2 teaspoons pure vanilla extract
- 3 Tablespoons milk
Directions
For the cookies
- Measure flour and baking soda in medium bowl. Combine and set aside.
- In large bowl, cream butter and brown sugar together until light and fuffy.
- Add instant vanilla pudding package and beat until well blended.
- Mix in eggs and vanilla.
- Slowly add flour mixture to butter mixture until just incorporated.
- Fold in chocolate chips with a spatula.
- Cover dough and chill in refrigerator for at least one hour.
- Remove dough from refrigerator.
- Preheat oven to 350 degrees Fahrenheit.
- Roll dough into balls (the size of 2 tablespoons) and place on greased baking sheet or silicone baking mat.
- Bake for 8 to 10 minutes.
- Remove from oven and cool on cookie sheet for several minutes before moving to a wire rack to cool completely.
For the frosting
- With a handheld or stand mixer fitted with a paddle attachment, beat the butter on medium speed until creamy – about 2 minutes.
- Add the confectioners’ sugar, cocoa powder, salt, vanilla extract, and milk, beating on low speed after each addition.
- Once everything is added, beat on high speed until creamy for about 2 minutes.
- Spoon frosting into resealable plastic bag or piping bag. Cut 1/2 inch off one corner of bag, and pipe and ample amount of frosting on bottom of 1 cookie.
- Place another cookie on top and press down at an angle so cookies look like an open mouth.
- Use extra frosting to attach candy eyes and place white chocolate chips in frosting to look like teeth.
Recipe courtesy of Kylee Wierks of Kylee’s Kitchen
Ingredients
Cookies
- 1 – package (16 oz) Pillsbury™ Ready To Bake!™ refrigerated chocolate chip cookies (24 cookies)
- 1 1/4 – cups white vanilla baking chips
- 1 – container ready-to-spread frosting (any white variety)
- Gel food colors, if desired
Decorations, if desired
- Red or black string licorice
- Miniature semisweet chocolate chips
- Large marshmallows
- Candy-coated chocolate candies
Directions


